Sans Rival!

Catherine of Munchie Musings was our November Daring Bakers’ host and she challenged us to make a traditional Filipino dessert – the delicious Sans Rival cake! And for those of us who wanted to try an additional Filipino dessert, Catherine also gave us a bonus recipe for Bibingka which comes from her friend Jun of Jun-blog.

I know I’m a few days late for posting but nevertheless, better late than never right? I’ve always wanted to make Sans Rival and I was glad when I found out this was the challenge for November! Sans Rival is basically layers of crunchy nutty meringue and buttercream. Both crunchy and chewy, a bit sweet but hey, it’s delicious.

I decided to half the recipe and make a cocoa meringue with pistachio nuts instead of the traditional cashews since I had a loads of pistachios just laying around waiting to be used. I probably should’ve stuck with the more traditional plain meringue as adding the cocoa lowered the sweetness which is one of the factors in Sans Rival but nevertheless, the texture was good.

The recipe for the buttercream made just enough to cover the layers as you can see. So if you decide to make this, I suggest adding times 1/2 more.

Thank you Catherine for this wonderful recipe and for exposing Filipino desserts! :D

My very first fondant cake!

As a baker, one of the things in my to-do list was to try my hand at fondant. I was quite hesitant to do so since I was never good with clay/play-doh when I was younger and not to mention, I don’t like eating fondant.

A few years ago, I came across a blogger who used Marshmallow Fondant (MMF) who said it was tastier than regular fondant. I decided to make my own instead of buying since it would be a lot cheaper and it also looked fairly easy to make.. but very sticky and messy. Hahaha..

I’ve been seeing loads of really cute ruffle and gradient cakes that I wanted to make my own. I know the design is rather forgiving since it’s a bit rustic but I like rustic designs anyway so I decided to go for it!

As you can see, I wasn’t able to estimate well before cutting the bottom edges xD

Forming the rose and ruffles…

Ta-daaaa~!

It looks a bit rough around the edges (plus the cornstarch is still visible) but I’m quite proud of this creation ^^ Til next time ya’ll! :D

For the Marshmallow Fondant recipe and directions, please click here.

Povitica for Daring Bakers!

When I read that the next DB challenge was to make an Eastern European bread, I was excited! Not only was this another chance to make bread, it was also something new and something I never heard of.

However, I’m late with posting this as I had a bunch of orders (started a lil baking biz ;]) throughout the month. Sorry for the excuse, but I finally made my Povitica and it was delicious! The smell of it baking in the oven was just heavenly and I almost couldn’t contain myself from having a pinch before it could cool off.

As you can see, I had to use a rectangular cake mold (framing it with aluminum foil so the dough won’t spread much) since my loaf pan disappeared. But aside from that, it was quite easy and doesn’t take a long time to make at all. Very similar to making cinnamon rolls, just in loaf form. Just look at those swirls! :3

For the recipe, click here.

Croissants for Daring Bakers

The Daring Bakers go retro this month! Thanks to one of our very talented non-blogging members, Sarah, the Daring Bakers were challenged to make Croissants using a recipe from the Queen of French Cooking, none other than Julia Child!

Immediately my thoughts went back to my time in Switzerland where these deliciously flakey and addicting treats were abundant. I remember during brunch time on the weekends where the school’s buffet offered a basket full of mini croissants and pain des chocolats.

So I was quite excited as I’ve been wanting to conquer my fear of yeast.

Unfortunately, the results weren’t very good. I made the recipe four times but wasn’t totally happy with the results. I don’t blame the recipe because plenty of others have had success with it and it is Julia Child’s. Perhaps it’s my lack of experience in making breads, yeast, kneading or other conditions.

First try, with melted chocolate and crushed hazelnuts

The first two tries, the yeast was dead. I took a gamble and tried to proceed which of course resulted to the doughs not rising and therefore quite heavy after baking. The third try was better after buying new yeast, proofed it before using and it resulted in better, flaky and lighter texture but the center still had a raw feeling. The fourth and last try (which I forgot to take a picture of), I used active dry yeast instead of instant and I was excited since the dough was rising very well but after baking, the results were similar to the third try, but with less flaky dough. Really weird. Another thing was that I never was able to get 12 croissants but only 8.

2nd attempt

Third attempt

But anyhow, despite the unsuccessful tries this hasn’t turned me off baking breads since I LOVE eating bread and would love to one day be able to bake plenty of them. By the way, Nutella is love. I placed some inside/on the croissants and it was just heavenly.

Coconut Macarons

I’m not sure if I’m the only one but I think I’ve mentioned before that although macarons are pretty, I’m not a big fan of eating them. Sure I love the challenge of making them: getting creative with flavors, the right ‘lava’ like consistency, piping even sizes, and most of all, staring at the oven window praying to see if feet form. ;) But when it comes to consuming it, I normally would just cut one in half just to taste it. Weird, no?

So, I was in the supermarket the other day and while going through the baking ingredients aisle, I saw some almond meal/flour. Finally! Before, I used to buy expensive packs of slivered almonds and grind them in the food processor. This time around, I made some coconut macarons with an easy coconut filling I made up which tasted pretty good.

They have rather uneven coloring but what’s important is that they have feet!

Coconut Macaron Shells
adapted from Raspberri Cupcake
makes 48 shells/24 macarons

100g egg whites (I didn’t age them but popped it into the microwave for 10 seconds)
50g sugar
105g almond meal/flour
195g powdered sugar
2 tbsp. dessicated coconut

-Line 2 9′ x 13′ pans. Set aside.
-Whip egg whites until foamy. Gradually add sugar. Whip until stiff peaks form.
-In another bowl, sift together almond meal, powdered sugar and dessicated coconut.
-Note: when incorporating the dry ingredients to the egg whites, be rough at first to deflate the whites and to make sure that the dry ingredients are fully incorporated with the whites.
-Fold the dry ingredients into the egg whites until a lava like consistency is reached. To prevent overmixing, as mentioned above, I would be rough at folding the beginning until the ingredients are mixed thoroughly then slowly fold. To know the right consistency, after each fold, the batter should be shiny, not overly runny and would hold the form when the spatula is lifted. You can test on a small plate and see, if the batter still holds a peak BUT flattens itself out but does not spread too much then it’s good to go.
-Fill your piping bag and pipe onto lined pans, about 1 1/4″ in diameter. Give at least 1/2″ space between each shell.
-Leave on the counter for about 30-40 mins. or until the shell is dry. You’ll know when you touch it and nothing sticks.
-Preheat oven at 150C.
-Bake for 15 mins.
-Let cool completely before peeling off the paper or else the filling comes off.

looks like porridge, hehe.

Coconut Filling

1/2 cup whipping cream
1 cup dessicated coconut
1/2 cup condensed milk

-Whip cream until stiff.
-In a bowl, mix together dessicated coconut and condensed milk. The mixture will be somewhat dense and may seem like it needs more moisture but when combined with the whipping cream, it’ll be fine.
-Fold whipping cream into coconut mixture.
-Chill for about 10-20 minutes until not so  runny.

To assemble:

-Pair up the macaron shells depending on their sizes.
-Arrange shells one side up and one side down (like above photo) and pipe filling.
-Cover by slowly twisting the upper shell (kind of like the motion you do with twisting oreos) until filling evenly spreads but careful not to let filling spill over.
-EAT!

On a social networking note, on the right sidebar you may notice a widget that for Baking Between Cities’ Facebook page. There’s no other reason I set it up except that I was quite bored the other day and I’m just really curious how many would ‘like’ it. o_o

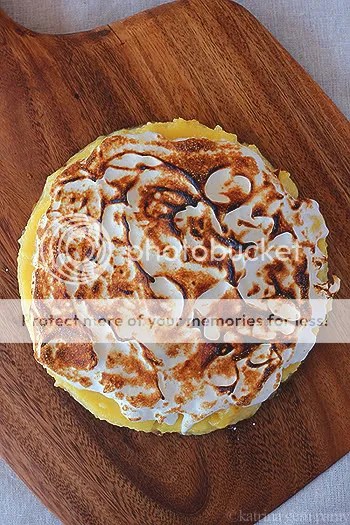
Calamansi Meringue Pie

A few days ago, I craved for some lime or lemon pie. Something sour and sweet at the same time. Unfortunately, I didn’t have any limes or lemons but what I did have were some calamansi. They’re these tiny limes abundant here in the Philippines and are about the size of a cherry tomato.

Yes, I had to squeeze the juice out of these tiny little limes and by the end of it, my thumbs were frozen in the squeeze form.

Okay, no not really but it definitely took much longer than squeezing out lime or lemon juices.

I used the recipe from food network from Giada’s Weekend Getaways program and halved it since I didn’t have enough calamansi. Unfortunately, I didn’t think through properly because the pan I used was too wide for the amount of filling thus, the relatively thin filling as you can see below. :(

The pie itself was deliciously sour although runny even after refrigerating since I think I pulled it out of the oven too soon or perhaps with the ratio of ingredients… but the meringue! I have grown to love torched meringue. Yummy goodness.

UPDATE: I placed the remainder of the pie in the freezer overnight and it’s a lot better!

Calamansi Pie
adapted from Joe’s Stone Crab Key Lime Pie recipe 

I did make this pie a couple of years back and it turned out great, as it should. However, I decided not to include the adapted version of the recipe of the pie itself here as it didn’t turn out properly, perhaps something wrong with the ratio of egg yolks and the baking time since I halved it.

Meringue
from MasterChef Australia

2 egg whites
1/4 cup sugar

-In a bowl, using a stand or hand mixer, beat egg whites until foamy.
-Gradually add sugar and beat until stiff.
-TORCH.

Mochi Ice Cream

Last weekend, I was in Manila for the long weekend. Between traffic, going around malls, shopping, window shopping and whatnot, there was the food. Although this post won’t be about those places where dined at (as I didn’t bring my camera to document.. surprise, surprise!), one thing I was able to try were some mochi ice cream which I’ve been wanting to try and they didn’t disappoint.

For the past few days, it has been incredibly hot here. Perfect, I thought, to try my hand at making mochis. After searching for a recipe, I learnt that it’s incredibly easy to make. Just really sticky and messy but it isn’t as time consuming as I thought. And very delicious.

These mochi ice creams were filled with the only flavor available in my freezer: Double Dutch, which I’m not so sure if it’s a flavor outside the Philippines but it’s vanilla ice cream with chocolate syrup, chocolate chips, cashews and marshmallows.

One thing I will try next time is to learn how to properly wrap without an obvious seal/wrap since as you can see, the mochi is really thick at the bottom. Aside from that, is there something you can add so that the mochi stays slightly chewy from the freezer without needing to thaw a bit?

I followed the recipe over at Use Real Butter.

Chocolates for Daring Bakers!

The August 2011 Daring Bakers’ Challenge was hosted by Lisa of Parsley, Sage, Desserts and Line Drive and Mandy of What the Fruitcake?!. These two sugar mavens challenged us to make sinfully delicious candies! This was a special challenge for the Daring Bakers because the good folks athttp://www.chocoley.com offered an amazing prize for the winner of the most creative and delicious candy!

When I saw the challenge posted at the forum, I wasn’t feeling quite excited to be honest. I remember a couple years back when I tried to make some truffles/bonbons without any knowledge of tempering. You could imagine how that ended up. Although I did try my hand at tempering chocolates at the Cailler Factory, I didn’t have all the gadgets and equipment to do so at home like the fancy thermometer and a slab of marble.

However, I did remember something during my very short on the job training in a pastry kitchen where I asked the chef how they temper the chocolates without the need of thermometers. She replied along the lines of testing the temperature with your bottom lip and knowing when it’s ready when you don’t feel any temperature at all, so to speak. So I went with that.

The result isn’t much of something to celebrate as it was just okay. Not the greatest nor the shiniest piece of truffle but tasty and took the form of the chocolate molds. We were required to make 2 kinds of candy for this challenge. For the first kind, we were required to use chocolate to make truffles or bonbons and for our second kind, anything we choose.

I decided to do both bonbons as I wanted to practice tempering without a thermometer. Which wasn’t a very good idea despite trying to follow the lip-test mentioned above. ;) But anyway, the bonbons I made are filled with ganache, mango and nutella. The first batch, which was the ganache filled, turned out pretty good and didn’t have any problems falling off the mold. The second batch however was the opposite. I did manage to salvage 4 pieces (total) of both mango and nutella. You should have seen my work space afterwards. I love chocolate but making some can be very very messy …Or maybe it’s just me. ;)

On the brighter side, I do hope to continue practicing my tempering.. perhaps buying myself a thermometer and some gloves eventually. Haha. Thank you to Lisa and Mandy for this challenge! :D